FAQ
-
Carpet & Carpet Cushion/Padding
-
Carpet & Carpet Cushion or Carpet Padding
-
Natural Stone
-
Ceramic Tiles
-
Terrazzo
-
Hardwood Flooring
-
Window Treatments
-
Kitchen Cabinets
-
Wallcovering / Wallpaper
-
Useful Information
CARPET & CARPET CUSHION or CARPET PADDING
What are the different carpet Constructions, Textures and Patterns?
Today’s carpet offers much more than a conventional loop pile. To add to a room’s sophistication and interest, consider choosing a textured pattern. New technology can produce multilevel loop and cut/loop patterns. Choose diamonds, bows, pin dots, or fleurs-de-lis designs that "pop out" in sculptured effects. The texture, colors, and pattern of the carpet can be made to complement or contrast with patterns of your furniture and window treatments. Using a solid color, textured carpet is a great way to provide interest and pizzazz, without going to a multicolor, overall pattern.
Textured styles also fit well with today’s active and casual lifestyles. Textured carpet can be created through the use of several construction techniques. Many of these styles are known for their soil-hiding ability.
*Cut pile: Loops are cut, leaving individual yarn tufts. Still one of today's most popular constructions, its durability is achieved with factors including the type of fiber, density of tufts, and the amount of twist in the yarn.
*Level loop pile: Loops are the same height, creating an informal look. It generally lasts a long time in high-traffic areas. Many of today’s popular Berber styles are level loop styles with flecks of a darker color on a lighter background.
*Multi-level loop pile: Usually has two to three different loop heights to create pattern effects, providing good durability and a more casual look.
*Cut and loop pile: Combination of cut and looped yarns. Provides variety of surface textures, including sculptured effects of squares, chevrons, swirls, etc.
What are the different types of cut-pile carpet?
A) Plush / Velvet: Smooth, level surfaces; formal atmosphere, "velvet."
B) Saxony: Smooth, level finish, but pile yarns have more twist so that the yarn ends are visible and create a less formal look. Minimizes foot prints.
C) Friezé: In this cut pile, the yarns are extremely twisted, forming a "curly" textured surface. This informal look also minimizes foot prints and vacuum marks.
VELVET CARPET:
Elegantly constructed, velvet carpets are fine and densely packed with tightly twisted tufts. The tufts appear to blend together, creating a rich sweep of color that lends itself to formal settings. VELVET is the simplest of all the woven carpets. Long ago, only cut pile was considered VELVET carpet. Loop-pile carpets on the same loom were known as “Tapestries.” Today, both cut-pile as well as loop-pile constructed on a velvet loom are called “VELVET.”
A VELVET loom is almost the same as the WILTON loom mechanism. Almost all of the face yarn is in the surface of the carpet, not hidden in the back. Unlike, the WILTON, normally there is only one row of face yarns between the warp backing yarns. The bulk of a VELVET carpet comes from the backing yarns and latex coating unlike the hidden yarns in a WILTON.
The leading quality factor in a VELVET is the pile density. This is achieved by specifying a number of wires per inch (pitch) or a heavy yarn weight. Today’s VELVETS commonly have a 162 or 189 or a 216 pitch and will vary from 7-10 wires per inch. Almost all VELVETS will be a two weft shot per wire.
NOTE:
"watermarking or pooling" is a term used in our industry for the strange shading and change of pile direction that sometimes takes place after a velvet carpet is installed in the home. This event could take several months to become apparent. It makes the new carpet look like a giant wet elephant sat on the carpet, twisted his rump on the carpet, and then disappeared. (not a pretty image is it).
Do not get too alarmed, as this event only happens in about one in one hundred velvet plush carpets that are installed. This is not a factory defect, but an unexplained happening that affects only this type of carpet.
FRIEZE CARPET:
Frieze is a highly twisted cut pile carpet suited for high traffic areas. It has short fibers that tend to curl in different directions at the surface to hide footprints and vacuum marks.
If you twist the yarn tightly, the tufts become more distinct and bend every which way. Instead of standing close to form a smooth surface, each tuft becomes an individual. And that's the secret to the nubby look of friezes. Friezes are made in a variety of densities ranging from a neat nub to the new, random, loose look from California. Rich colors look especially great in the highlights and shadows of this carpet's surface. Highly resilient, it's truly trackless, easy to clean, and crush resistant.
One of the most popular styles, it comes in wool and man made fibers. Variously described as "Hardtwist" the yarn has been given an extra turn or two and this results in a rougher surface texture which is less prone to showing footmarks.
A good quality Frieze styled carpet can be one of the most durable styles you can buy. With its heavy texturing, it also exhibits some of the same characteristics as the Textured style, such as its ability to hide footprints and vacuum lines, as well as holding up extremely well under heavy traffic.
WOVEN CARPET:
Woven carpet is the traditional method of making carpets in the West. It is an expensive method, but the product is more durable than carpet produced by other methods. Woven carpet made on the simplest loom is the velvet loom (not to be confused with the velvety texture of cut pile.) It can produce a wide variety of textures, but color patterns are limited to tweed effects and stripes. Two other well-known types of woven carpet are Axminster and Wilton, both originally produced in England. In both methods the pile is woven at the same time as the backing material, but in Axminster woven carpet, the pile consists of individual tufts, inserted into the backing by a patterning device. This method permits many different colors to be combined in the carpet, often in very intricate designs.
Wilton carpet is an industrial weaving technique that derives its name from the type of loom which weaves the yarn in a continuous strand. This technique permits only a few colors to be used in any one carpet. Smooth, velvety surface and top quality construction, especially when worsted yarn is used.
Woven Carpet Features:
1) Colored pile yarns and backing yarns woven simultaneously into finished product
2) Primarily used in commercial installations.
3) Heavy, firm hand; high strength.
4) Often used in hospitality settings
WILTON CARPET:
In a Wilton carpet the pile is in the form of a continuous yarn, which produces a series of loops; these may then be cut for a cut-pile finish. Although the continuous yarn theoretically makes Wilton the strongest of carpets, it limits the design potential, as only a maximum of five colors can be used together. Wilton can be woven as a textured design with two yarns, usually of slightly different shades of the same color; one shade is a higher-cut pile and the other is shorter and left looped to create a three-dimensional pattern.
For many years, only cut-pile carpets woven on a Jacquard loom were known as “WILTON.” A loop-pile made on the same loom was called a “BRUSSELS.” Today, both loop-pile, cut-pile and cut-and loop pile are made on a Jacquard loom and known as “WILTON.” The pitch, the wires per inch and the yarn weight gauge the quality of a WILTON. All high quality WILTONS were made with a 256 pitch and 10 or more wires per inch. Today, most high quality WILTONS are made with a 252 pitch and 7-10 wires per inch.
WILTON carpet is somewhat limited to the amount of colors that can be woven into carpet. The yarn spools are mounted on frames. A five-frame WILTON has five colors, but the most common WILTONS are made of two and three frames. Additional colors can be added by “Planting” yarns into the weave. This system allows additional color to be substituted for one of the original colors in a row of tufts. A five-frame WILTON would appear to have six or more frames due to the “Planting” of other colors.
The most unique characteristic of a WILTON is that the face yarns that are not selected by the Jacquard mechanism as part of the face pile, stay hidden in the back of the carpet interlaced with the weft, warp and stuffer yarns. This makes the pattern or face pile easy to see from the back of the carpet. Most WILTON carpet is two shot; two weft yarns per wire of face yarns. Many WILTONS are coated on the back with latex or a similar resin. There are many different WILTON carpets, such as; “face-to-face” and “flat weaves.”
Carpet made on Wilton loom; can have various pile heights (level or multi-level and can have loop or cut)
AXMINSTER CARPET:
Axminster carpet is one of the basic weaves that originated in the 1700’s in the town of Axminster, England. Axminster carpets were knotted in wool on woolen warps, with wefts of flax or hemp, and featured Renaissance architectural or floral patterns. The Axminster carpet factory closed in 1835 with the advent of industrial weaving machines. The name survives as a generic term for all machine-made carpets with pile similar to velvet or chenille. Unlike the Wilton weave, almost all pile yarn appears on the surface of this carpeting. This beautifully classic, and traditional carpet is suitable for wall-to-wall applications, on stairs or even custom cut into special area rug treatments.
Axminster is quick to point out that a patterned Axminster carpet in British Wool is the most practical flooring choice available today. Axminster carpet rarely shows spots, spills and everyday wear and is specified for many public buildings for these reasons as well as for safety and comfort. It is an all round carpet fiber and is their first choice, making the company a leading manufacturer of 100% woven wool carpets in the UK. Wool resists cigarette burns and does not readily support combustion plus, it is less prone to static and can tolerate a high moisture content without feeling wet.
If you are looking for a beautifully patterned Axminster wool carpet woven in the most beautiful array of colors, you will not be disappointed. Axminster rugs are unique due to their intricate designs and European flavor. This unique look was invented in England in the early 19th century. It was invented to simulate the beauty of hand woven carpet. These types of rugs are found in fine hotels and beautiful homes throughout the world. They are not only beautiful, but are also constructed to withstand the heaviest of traffic found in such places as hotel lobbies, casino's, or perhaps your busy household. If you have a beautiful staircase or a special room to carpet, this style definitely makes a statement.
Like an oriental rug, fibers are woven in and out through the surface backing on an Axminster carpet machine. This loom inserts pile tufts into the weave from above so that strands need not run along the back, enabling a multitude of colors to be used. Chosen by hotels and commercial lobbies for its durability and cleanability, the surface is a cut file, available in long and shaggy, short and smooth, stubby or carved carpets. Yard for yard, it is comparatively more expensive than carpets made on high speed modern tufting machines.
Axminster Carpet Features:
1) Carpet made on Axminster loom; cut pile only; most are single level cut pile, but can be multi-level as well.
2) Offers wide range of patterns and colors.
3) Regarded for withstanding heavy traffic; used mostly in commercial applications and area rugs.
4) Weaving process contributes to durability, strength and firmness.
What is BCF (Bulked Continuous Filament)?
Continuous strands of nylon are formed into yarn. They are also texturized to increase their bulk and to change from straight into kinked or curled fibers. This increases the "bulk" of the final carpet and makes the twist in yarns more permanent producing better wear resistance. And because BCF (Bulked Continuous Filament) fiber is one continuous strand of fiber, it will not shed loose fibers like staple fibers will, causing the owner to constantly vacuum to remove them.
Why do I need carpet cushion or carpet padding for my new carpet?
A firm and resilient carpet cushion is necessary to form a good foundation for your carpet, increasing its comfort and extending its life, by absorbing the impact of foot traffic. Cushion also adds insulation and reduces noise.
How do I select the appropriate carpet cushion, or pad (carpet padding)?
Select the appropriate carpet cushion, or pad, according to the carpet manufacturer's requirements for type, thickness, and density. Carpet cushion is made primarily from polyurethane foam, fiber, or rubber. The type and thickness of cushion needed varies according to the type of carpet:
A) Cut pile, cut and loop, or high-level loop carpet requires a resilient, firm cushion with a maximum thickness of 7/16" thick, with a minimum FHA density.
B) Berber, and other low-pile carpet, requires a thin, dense cushion with a maximum thickness of 3/8" thick.
How should I maintain my STAINMASTER® carpet?
There are three key steps in a proper maintenance plan: Vacuum frequently, clean spills promptly, and have professional carpet cleanings at least annually. Remember, also, to maintain your texture retention warranty, you need to have a professional steam cleaning/ hot water extraction at least every 18-24 months.
Will vacuuming regularly decrease the stain resistant chemical in my carpet?
No. Regular vacuuming is an important part of complete carpet maintenance. Vacuuming will help to remove dry soil particles that can dull fibers and cause matting to occur.
Does steam cleaning affect stain resistance of STAINMASTER® carpet?
No. Tests indicate steam cleaning does not affect the stain resistance performance of STAINMASTER®. STAINMASTER® texture retention warranties require steam cleaning or hot water extraction at least every 18-24 months.
How do I remove a stain from my STAINMASTER® carpet?
Our recommended cleaning procedure is the use of a mild liquid dishwashing detergent with sufficient quantities of water to flush the stain out of the carpet. After each application of the detergent and water, be sure to blot any excess moisture with a clean white cloth. Always blot from the outer edge of the stain, moving towards the middle to prevent spreading. On more difficult stains or larger areas, professional cleaning recomended.
Will stains lift off STAINMASTER® no matter how long they are left on?
You will always want to remove the stain as soon as possible, but with Stainmaster® protection you can remove most stains even after 24 hours. Of course, it depends on what type of stain it is as to whether it can be removed after a certain time has elapsed. Repeated attempts at stain removal may be necessary in certain circumstances.
Do cleaning solvents harm the stain resistance mechanism?
Certain cleaning solvents may affect colorfastness, or harm the stain resistant chemistry. You should always do a small spot check to assure that the solvent is safe on your carpet.
Can you use other spot cleaning procedures or just water on STAINMASTER® carpet?
STAINMASTER® carpet is engineered so that the stain molecules do not adhere to the fiber. Our recommended cleaning procedure is the use of a mild liquid dishwashing detergent with sufficient quantities of water to flush the stain out of the carpet. A wet vacuum or steam-cleaning machine may be used on heavy or difficult stains. This procedure is for spot cleaning or the removal of stains ONLY. We recommend periodic professional cleaning as part of your regular maintenance plan for your carpet.
Are there deodorizers for use after cleaning stain/odor from carpet?
Yes. Consult a professional cleaner for recommendations on professional deodorizing products. Otherwise we recommend a mixture of two tablespoons white distilled vinegar to one-quart water.
Do I have to apply an after-treatment to preserve my STAINMASTER® warranty?
No.
Will I void my warranty by applying an after-treatment?
If you use a fluorine based (water-based) after-treatment product, you will not void your STAINMASTER® warranty. However, some after-treatments are solvent-based or silicone-based which may invalidate your warranty. If you have questions on the contents of any after-treatment, you should contact the manufacturer prior to using it on your carpet.
How often do you recommend I have my carpet professionally cleaned?
Frequency of cleaning should be determined based on household conditions. We recommend a professional cleaning at least every 12 months. (Professional steam cleaning/ hot water extraction at least every 18-24 months is required to maintain your texture retention warranty).
Which professional carpet cleaning methods does STAINMASTER® recommend?
For the texture retention warranty, STAINMASTER® requires the steam cleaning (hot water extraction) method at least every 18-24 months. This method can also be used for regular carpet maintenance.
Other wet or dry methods when properly done are also acceptable. These methods include: absorbent pad or bonnet cleaning, rotary shampoo, and dry foam powder.
Is do-it-yourself carpet cleaning okay?
Professional cleaning is recommended for any carpet. If you decide to do it yourself, carefully follow these guidelines:
Follow the manufacturer's directions carefully. Avoid using too much detergent, as it could cause resoiling. Rinse thoroughly.
Use only cleaning solutions that are acceptable for use on stain and soil resistant carpet. Cationic or chemicals with a pH greater than 10 should be avoided as they may void your warranty.
Remember that professional cleaning is required at least every 18-24 months to maintain your warranty.
NATURAL STONES
How do I care for my Natural Stone?
These stones are pretty easy to maintain, just use warm water and a dry cloth to clean up most spills on these surfaces.
MARBLE: Marble is a porous, a much softer stone then granite and requires a bit more attention, treat this stone like a fine piece of jewelry. Just take the extra precaution by having your guests use a coaster when enjoying a beverage and avoid oils and substances that have been left there and able to absorb into the stone.
GRANITE: Granite is a very hard material from nature, before the use of your granite countertop, please make sure that the proper sealant has been applied. Make sure to reseal your Granite as often as needed.
How do I clean my Granite Countertop on a daily basis?
Just apply the original Windex (the blue kind) and be sure not to use any lemon or orange products as this will break down the sealer that has been applied.
What is Travertine?
Travertine belongs to the larger family of stone called Limestone also known as Calcium Carbonate. Marble is also a type of Limestone that has had additional heat and pressure applied to it by the earth’s crust. Travertine is formed by minerals dissolving in ground water and then being deposited on the earth’s surface by rivers, natural springs, or geysers.
What colors does Travertine come in?
Travertine comes in many different colors including Ivory, Beige, Walnut, Noce, Gold and Coffee. The color of Travertine is the result of iron compounds or other organic impurities.
What does the finished surface of Travertine look like?
Travertine can have four major finishes, POLISHED (shiny), HONED (matte), BRUSHED and TUMBLED (textured surfaces). The type of finish given to the Travertine will determine how shiny the surface will be. The Polished and Honed surfaces are flat and smooth, while the Brushed and Tumbled surfaces are flat and textured. The Polished surface is the shiniest, while the Tumbled surface reflects the least amount of light. The most common finish for Travertine is Honed.
Where would I use Travertine?
Travertine has been used in the construction of buildings for thousands of year. In today’s construction, Travertine is used for flooring, cladding on buildings, showers, wall coverings and countertops.
What should I consider in using Travertine?
Travertine is a natural stone product. Because the minerals that make up Travertine are highly reactive with acidic solutions (e.g. orange juice, vinegar), a major consideration is where the Travertine will be installed and what it will be exposed to. Sealers will provide some protection to the stone no matter what the environment, but knowing what it will be exposed to will help you decide whether Travertine is a good fit for your project.
CERAMIC TILES
Is there a difference between porcelain tile and ceramic tiles?
Porcelain tiles are also ceramic tiles. Rather, the question should be, "What are the differences between porcelain tiles and non-porcelain tiles?"
What are the differences between porcelain tiles and non-porcelain tiles?
Porcelain tiles are typically made with "porcelain" clays that have specific properties. Porcelain is resistant to wear, deep abrasion, frost, and has a very low water absorption. It is a practically non-absorbent material with great fluxural strength. Quality porcelain will remain constant over time. Porcelain is ideal for interior and exterior floors and walls and even facades of buildings. It is available in natural, smooth, polished and structured finishes.
CERAMIC TILE or non-porcelain tile is generally made from red or white clay fired in a kiln. They are almost always finished with a durable glaze which carries the color and pattern. These tiles are used in both wall tile and floor tile applications, are softer and easier to cut than porcelain, and usually carry a PEI 0 to 3 rating. Non-porcelain ceramic tiles are usually suitable for very light to moderate traffic and generally have a relatively high water absorption rating making them less frost resistant and they are more prone to wear and chipping than porcelain tiles.
PORCELAIN TILE is a tile that is generally made by the dust pressed method from porcelain clays which result in a tile that is dense, impervious, fine grained and smooth, with a sharply formed face. Porcelain tiles usually have a much lower water absorption rate (less than 0.5%) than non-porcelain tiles making them frost resistant or frost-proof. Glazed porcelain tiles are much harder and more wear and damage resistant than non-porcelain ceramic tiles, making them suitable for any application from light traffic to the heaviest residential and light commercial traffic. Full body porcelain tiles carry the color and pattern through the entire thickness of the tile making them virtually impervious to wear and are suitable for any application from residential to the highest traffic commercial or industrial applications. Porcelain tiles are available in matte, unglazed or a high polished finish.
What is a through-body porcelain tile?
Some people refer to unglazed porcelain tile as "through body", where the color on the tops goes all the way through. Even in the extreme (commercial) applications, these tiles tend not to show wear as the porcelain is quite durable and the color goes all the way through.
How about the glazed porcelain tile durability?
Many glazed porcelains also have extremely good durability. Although the color in the glaze layer may be different from the body, the surface is usually sufficient resistant to abrrasion to not show wear in typical applications.
What is a roto printing technology in the porcelain tile? And, why is it popular?
Roto printing is the latest technology that enables random printing. This means each tile will have a different looks, no repeat or similar looks, just like a Natural Stone (Marble or Travertine). And, when the tile is installed, the Roto will bring out the Natural Stone looks of your tile.
TERRAZZO
Note: All recommended procedures are applicable to precast terrazzo.
What is the difference in cement and epoxy terrazzo?
Cement: This system was the only system available for years and is used both in thin and thick projects. Normal wear can be expected to affect the aggregate more than the cement.
Epoxy: This system has superior adhesion qualities and color range not available with cements. With its high abrasive resistance, resists wear and also decreases the wear of the aggregate yielding somewhat better durability. Both systems can be expected to last the life of the building, even with heavy use.
What caused the discoloration at the metal divider strips?
This question arises frequently with poured in place floors and is also a consideration with precast terrazzo base, treads or any item with accent strips. Metal divider strips in various gauges have been used extensively in terrazzo floors for many years. Initially the strips may tarnish or discolor temporarily. This temporary discoloration is beyond the control of the terrazzo contractor as it is created by the water and cement combination that is used in the installation of the terrazzo. Do not be alarmed; this condition has developed from the trapped moisture that remains in the system. The moisture used in the flooring system must dissipate during the curing period. Thus, with the sealer on the surface, the moisture moves laterally to the nearest divider strip to escape and that moisture can temporarily lead to discoloring.
How should I clean my terrazzo floor?
Use a scrubbing machine with a 16” to 20” diameter brush. Place a soft-type pad on the brush to aid in holding a 3M-type screen mesh pad. It should be emphasized that these mesh pads should only be used two or three times annually. The grit of the screen mesh pad can be one of the following: #60, #80 or #100. (The lower the number the coarser the grit.) Using a neutral cleaner and water as lubrication, scrub the floor surface. After several passes in different directions, you should recognize the removal of all foreign matter from the surface. The cleaning cycle program should be regulated by the amount of foot traffic. As the terrazzo floor ages the maintenance requirements are lessened.
What sealers are recommended for terrazzo floors?
All sealers should be UL listed for “Slip Resistance” and required to produce a static coefficient of friction (SCOF) of 0.5 minimum.
Note: Some jurisdictions now require a SCOF of 0.6 minimum to comply with ADA regulations. In this case, the sealer used must be specified to produce a SCOF of 0.6 minimum. Several sealers are capable of meeting this standard.
New cement terrazzo systems: should be sealed with water-based sealers during the initial year following completion. In the second year, the system can be sealed with the solvent-based sealer, if so desired.
Epoxy terrazzo systems: can be sealed with a solvent or water-based sealer immediately following the polishing process after overnight drying.
How should I care for my terrazzo floor?
The use of a pure surface coating (as most floor waxes are) is unnecessary and ordinarily NOT recommended. Applying a surface coating or wax may decrease the non-slip co-efficient of friction below the standard rating of 0.5. The marble chips and aggregates, which make up 70% of the terrazzo floor, have very low porosity and do not absorb most staining substances. The portion of the terrazzo that needs protection is the binder, especially portland cement, which is porous and will absorb stains. Terrazzo does not need protection from wear, it needs protection from absorption and this is achieved through the use of a penetrating sealer which seals off the pores in the binder.
HARDWOOD FLOORING
What are the different grades of Hardwood Flooring?
CLEAR is free of defects though it may have minor imperfections. This grade is further identified by cut, CLEAR PLAIN, CLEAR QUARTERED.
SELECT & BETTER is almost clear, but contains more natural characteristics such as knots and color variations. This grade is further identified by cut, SELECT PLAIN, SELECT QUARTERED.
#1 COMMON has a variegated appearance, light and dark colors, knots, flags and worm holes.
#2 COMMON is rustic in appearance and allows all wood characteristics of the species.
What is the Janka hardness test?
The Janka test is conducted by measuring the force needed to lodge a .444-inch steel ball in the wood species to a depth of half the ball's diameter. The higher the rating, the harder is the species of wood.
What are the traditional types of cutting timber into boards?
There are a variety of ways that lumber can be cut out of a log including plainsawn, rift sawn and quarter sawn. Each method has its own advantages and disadvantages.
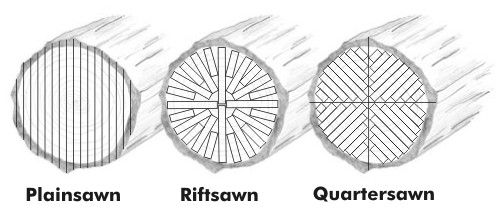
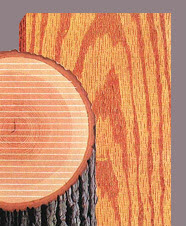
Plain Sawn
Plainsawn wood is perhaps the most straightforward way to cut rectangular-profiled boards out of a round log. As shown in the drawing below, sawmills create plain sawn lumber by making a series of parallel cuts in a log. This system of cutting wood provides excellent yield because it minimizes scrap. Unfortunately, plain sawn lumber has some critical disadvantages. Woodgrain in a log is comprised of a series of concentric rings beginning in the center. Plain sawn boards have substantially different grain patterns depending on where they were cut out of the log. Since wood expands and contracts in different ways with respect to grain, plain sawn lumber is typically less stable than the alternatives listed below. The tendency of wood to expand and contract is called wood movement. Plain sawn wood often has interesting grain patterns (often called cathedrals) that are not created by other types of cutting.
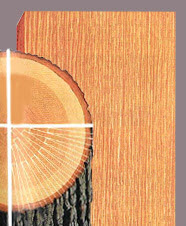
Rift Sawn
Rift sawn lumber is much more stable than plain sawn lumber. As shown in the drawing, each board has the same relation to the log, and therefore each board will have the same grain pattern. Furniture made out of rift sawn wood has more of a uniform appearance due to the similarity of grain patterns among different boards. Unfortunately, rift-sawing provides very poor yield and as is evident in the drawing, lots of wedge-shaped scraps are produced. The low yield has ensured that rift sawn wood is a rarity at the lumber yard.
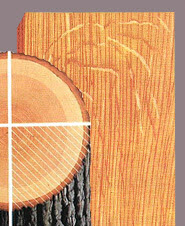
Quarter Sawn
Quartersawn boards are created by first cutting a log into quarters and then creating a series of parallel cuts perpendicular to the tree's rings. The yield is not as substantial as in plain sawing but much greater than in rift sawing. The grain in quartersawn wood is relatively consistent (straight grained pattern on the face), and therefore the end product is stable and often preferred by woodworkers and furniture-makers. Quartersawn wood may include medullary rays and wavy grain patterns that some people prefer to the figures that are revealed with alternative sawing methods. The quartersawn board will only shrink in thickness and will remain stable in flooring, millwork, furniture or cabinetry applications. It is the best option for the radiant heated floors and critical applications. In general it is a superior choice to minimize seasonal gaps, buckling etc. It has stability rivaling engineered floors and longevity of the solid wood floor - that what makes rift/quartered sawn flooring the best choice for discriminating buyer.
What is the difference between Quartered and Rift Sawn Hardwood?
In Quarter sawn White and Red Oak, a visual distinction is made between "quartered" and "rift". Red and White Oak have, as part of their biology, large bands of radial cells called "Medullary Rays" which emanate outward from the center of the log, similar to the spokes of a wheel. These radial cells transmit water and nutrients outward as the tree grows. While all trees have Medullary Rays, it is only in the Oaks that these rays are pronounced. The Quarter sawing process reveals to greater and lesser degrees, the beautiful appearance of these rays. This appearance quality is known as "ray fleck", "figure" or "ray".
Quartered: The quartered boards are those boards exhibiting the most figure. These boards generally have growth rings at a 60-90 degree angle to the face of the board.
Rift: The rift boards exhibit less figure and are most often those boards with the growth rings at a 30-60 degree angle to the face of the board.
Common Characteristics of "Quartered" and "Rift"
All quarter sawn boards share one characteristic: the growth rings manifest themselves on the face of the board as straight grain. The principal benefit of quarter sawing technique is that all of the grain will be straight, showing none of the "cathedral grain" characteristics of plain sawing. This straight grain also allows for edge gluing for width while maintaining a consistent appearance across the face of the board.
Quartersawing is a slower process that involves cutting from the inside outwards, turning the quarter log "cant" end for end and cutting alternate faces. This method is more labor and technologically intensive, yielding slightly narrower boards, but with greater strength, stability and character than plain sawn.
What are the Floor Finishing Instructions?
To restore beauty and protection to your hardwood floors, follow these four simple steps:
Prepare Sand Stain (if desired) Finish
Prepare
1. Readying the Room
Remove all furniture, vent covers, pictures, drapes, doors and closet contents. Cover door openings with plastic drop sheets and place a mat or drop cloth at the entrance for wiping feet. Turn off all heat and air conditioning and plug vents with plastic shopping bags filled with newspaper. (This will prevent dust from infiltrating the air ducts.)
Remove all quarter-round moldings cautiously with a pry bar. Number each piece as you remove it to facilitate reinstallation.
2. Inspecting the Floor
Inspect the floor for holes, gaps or exposed nails. Holes should be filled with a water-based wood filler. Nails should be removed and the holes filled with filler or patch.
Note: Vinyl and V-groove Flooring
Floors with a factory vinyl coat cannot be refinished unless the vinyl coating is completely removed. V-Groove Flooring has small grooves running the length of the floor. These grooves are impossible to sand with the sanding machine so you may want to consider using Renewal for V-Groove floors.
Sand
The floor is now prepared, but before you begin sanding, read the following helpful hints to facilitate the process.
Choosing the Right Sandpaper
To repair stains, pits and gouges, sand floor once with each of the following grains of sandpaper: 36 grit, 50 grit, and then 80 grit. When applying finish on new unfinished wood floors, use the 50 grit and then 80 grit.
Safety Precautions
Always wear protective eyewear and a dust mask when sanding. Refrain from smoking and extinguish all furnace pilot lights.
Loading the Sander
First, make sure that the sander is unplugged and the switch is in the “off” position. Next, tilt the sander motor back so the sanding heads are exposed by laying the machine’s handle on the floor. Place the appropriate sandpaper on the sanding pads. Stand the machine up and you are ready to go!
Using the Sander
Position the power cord safely out of the way of the machine. Stand directly behind the sander.
Monitoring Sanding Efficiency
If the amount of dust created by the sander increases considerably its time to empty the vacuum bag. To operate the vacuum, follow the operating instructions on the vacuum canister.
Touch-up Sanding
Once you have progressed through each successive grit of sandpaper, check the floor for missed spots. You may need a palm sander to reach edges or low-lying spots. Follow the same progression of grits you used for the large sander.
Cleaning Up Dust
After sanding, vacuum the floor several times using a wet/dry type vacuum. Clean all windowsills, door frames, and any place where dust has collected. Wipe the floor with damp, lint-free cloths to remove the last of the dust particles. Let dry.
Stain (Optional)
Apply stain only if you wish to change the color of your wood floor.
Testing the Color
A stain’s color will vary on different woods. Test the color effect on your wood in an inconspicuous spot (like a closet) before proceeding. Once the color meets your specifications, plan the staining process so you end up at an area where you can exit the room.
Preparing the Floor
To avoid lap marks when using a water-based stain, keep a wet edge in the stain path and dampen the floor slightly before beginning.
Varathane Applicators
The applicators available at the Floor Finishing Centers will speed up the staining process. Check to see if your paint tray is wide enough for the 8” applicator.
Applying the Stain
After stirring the contents of the can thoroughly and pouring it into the paint tray, dip the applicator into the stain and flow it evenly across the floor. Move with the grain. Once you’ve worked a length of the floor, wipe off excess stain promptly with a clean lint-free cloth. Continue the same process for the entire floor.
Touch-up Staining
Use a brush to stain any edges or tight areas you might have missed.
Applying Another Coat of Stain
If you want a darker color than you achieved with your first coat of stain, additional coats will darken the floor. After the first coat has dried for at least three hours, test a second coat in an inconspicuous area to ensure the color change meets your specifications. Allow to dry at least three hours between any additional coats. If you apply several coats of stain, allow the floor to dry a full 24 hours before applying a topcoat.
Finish
Preparing to Finish
Before beginning, plan your application so you finish at an exit. By investing in the applicators available at the Floor Finishing Centers, you’ll speed up the process.
Applying the Finish
After stirring, pour the finish gently into the paint tray and use the appropriate applicator. Do not pour finish directly onto the floor. First determine your exit. Using the appropriate applicator, start at the farthest point from the exit and work toward the exit, always pulling the applicator in the direction of the wood grain.
Helpful Tips
*Move in opposing directions after each pass (room length) to keep a wet edge
*Apply the finish generously as needed
*Take your time
*Touch-up Finishing
*Let the coat completely dry before beginning any touch-up. Use A brush applicators to reach tight areas and edges.
Applying Multiple Coats
Before proceeding with a second or third coat, lightly sand the floor in an inconspicuous spot. If the finish gums up, drags or clogs, leave it a few hours and test again. If not, proceed with an additional coat. When you apply a second and third coat within the recommended dry times (see product labels), then sanding is not necessary between coats; however a light sanding before the final coat gives a better appearance to the finish.
Finishing Bare or New Floors
Four coats are recommended for bare or new floors.
Congratulations on a job well done.
After the final coat of finish is dry, step back and admire your handiwork. Chances are the floor looks better than you imagined. And what’s more, you did it all yourself – proof that using the right tools, the right products and the right instructions will always result in beautiful, protected hardwood floors.
What are the creative options in appearance for Hardwood Floor?
Hand Scraped & Machine Scraped
Scraping Hardwood so it gives uneven feel and look in appearance. Matchin Scraped patterns can become repetitious if your look close enough. On the flip side, there are many true hand scraped hardwoods, done entirely by hand. These are sold prefinished or unfinished.
Time Worn Aged
Time worn aged offers characteristics of a hardwood floor that has seen distressing caused by age, such as dark colored staining to highlight the grain in the hardwood species itself. In some cases mild contouring of the hardwood is also seen along with character markings.
Wire Brushed
Wire brushing brings out the grain in the hardwood. The sapwood is removed by brushing, causing a highlighted grainy effect that is not only visible on close inspection, but obvious feel.
Antique
An antiqued look typically calls for using a lower grade of hardwood applied with darker colored stains that in turn bring out the highlights of the grain. Lower grade doesn't demonstrate lower quality, but more color variation and character.
Hand Sculpted
Hand sculpted is a term used for flooring that has a smoother distressed appearance. Scraping or sculpting is often smooth and more uniform in appearance.
French Bleed
Prefinished French bleed is new and generally made up of deeper beveled edge appearances. Prior to the staining process, end and side joints are highlighted with a rich black or dark colored stain.
Pegged
Adding to the aged look one can choose pegged flooring. Pegs offer a decorative appearance, does not offer any structural benefits and is not fastened to subfloors much like older floors of the past.
Hand Hewn or Rough Sawn
These types of floors offer the roughest appearance. Sawing marks are clearly visible.
How do you whitewash a hardwood floor?
You can use either a specially formulated stain or you can make your own by taking either oil based paint or latex (water based) paint and reducing it about 25 percent, apply areas the whole length or width of the floor, depending on which way the flooring runs..You can apply with a paint roller..then let set for about 2 minutes..then take clean rags and wipe over the surface WITH THE GRAIN.....remove as much as you want..some prefer to leave a white film all over the entire surface..and some like it wiped down to where it is just in the grain..let dry over night..apply one coat of polyurethane..let dry..sand it with 220 grit sand paper..just buff lightly to remove the "raised grain" vacuum..then apply another coat of polyurethane..etc..You can do this also with oil based paint but the drying time,odor, and clean up is terrible..Alot here get confused when some people say whitewash..for in the old days..we mixed lime and water together to "whitewash" or paint exterior beams, wood etc..Now days the term "whitewash" relates to staining wood etc..or also called "pickling"...You can also dilute your paint of choice 25% if you want it deeper colored..practice on some scrap wood of the same flooring you are using.
What is the difference between a limed piece and a whitewashed piece?
Liming is similar to whitewashing. Both involve the use of white, off-white or pastel stains and/or glazes. This is usually done on an open pore wood like oak, as opposed to a closed pore wood like maple. The only difference between a limed piece and a whitewashed piece is noting but A limed piece has a wash-coat or sealer coat applied prior to applying the white, off-white, or pastel stain or glaze (glazes are not put directly on wood anyway, they are sandwiched between layers of finish or sealer). The limed wood has a more subtle coloring than the whitewashed wood.
WINDOW TREATMENTS
How do I measure my window to receive Horizontal Blinds and Shades?
Inside mount:
*Inside mount blinds and shades are installed inside the window casing. Minimum depth requirements vary by product and headrail type, or by tube size (for roller and solar shades). See your sales person for more information.
*Measure the exact inside width of window casing from one inside edge to the other in three different places. Record the narrowest measurement. Measure the exact height in three different places from top edge of opening to top of sill. Record the longest measurement. Solar and roller shades should be measured at the top only.
*Do not take any deductions for clearance. The factory will take necessary deductions for a perfect fit.
*Measure the window diagonally in two places, as shown. If the two diagonal dimensions are not equal, we recommend an outside mount application for optimal function and aesthetics.
Additional Information for Measuring Roller and Solar Shades:
a) On Continuous Loop inside mounts, there is a 11/16" light gap per side. On Cordless inside mounts, there is approximately 1" of light gap on right and just over ½" on left.
b) For optimal light and glare control, outside mount is recommended, or you may add a secondary soft window treatment (drapery or curtain) to hide the light gap on an inside mount.
c) Fabric width is 1 1/8"- 1 3/8" narrower than finished shade width of the tube and its components on Continuous Loop shades.
d) Fabric width is 1" narrower than finished shade width of the tube and components (without valance or side covers) on Cordless shade
Outside Mount:
*Outside mount blinds and shades are installed outside the window casing, covering an area larger than the window itself.
*Measure the exact width to be covered. Be sure the measurement overlaps the window opening by at least 1½" on each side (3" total overlap) to ensure light control and privacy. Note: For roller and solar shades, make sure the measurement overlaps the window opening by at least 2 ¼" on each side (4 ½" total overlap) to ensure light control and privacy.
*Measure exact height to be covered, including desired overlap (typically from top edge of molding to bottom edge, or to top of sill if there is one).
*The factory makes NO allowances on outside mount.
How do I measure my window to receive Vertical Blinds, Cellular Shades and Sliding Panels ?
Inside Mount:
*Inside mount blinds are installed inside a window casing or door, or wall to wall in a room. The window casing must be at least: 2 ¾" deep for vertical blind track flush mount; 3 ¾" deep for vertical vanes flush mount; 2 7/8" for VertiCell; 1" for two or three channel or 1¾" for four or five channel headrail or sliding panel. Otherwise, an angle bracket may be necessary.
*Window Casing Depth Requirements (otherwise, an angle bracket may be necessary):
a)Vertical blinds - Minimum mounting depth required is 2 3/8"; depth required for vertical blind track flush mount is
2 ¾"; depth required for vertical vanes flush mount is 3 ¾".
b)Soft vertical blinds - Minimum mounting depth required is 3 ¾"; depth required for flush headrail mount is 4"; depth required for flush vane mount is 4 ¾".
c)VertiCell shades - Minimum mounting depth required is 1 ¾"; depth required for flush headrail mount is 2 7/8".
d)Sliding panels - Minimum mounting depth is 1" for two or three channel and 1¾" for four or five channel headrail.
*Measure the exact inside width of window casing from one inside edge to the other in three different places. Record the narrowest measurement.
*Measure the exact height in three different places from top edge of opening to top of sill. Record the shortest measurement.
*Do not take deductions. Allowances are made at the factory to ensure a perfect fit.
*Note on Soft Vertical Blinds: A fabric panel (approx. 2") has been added to prevent light gap on each end of the blind when rotated open. This fabric panel will not stack tightly on each side of the vanes and is considered a natural characteristic of the blind. On a Split Draw, the middle two vanes will be spaced closer together and have a larger overlap to provide increased privacy and light control.
Outside Mount:
*Outside mount blinds are installed outside the window casing, covering an area larger than the window itself.
*Outside mount is recommended for optimal appearance and light control.
*Measure the exact width of window, including the frame if there is one. Add 3" for each side (6" total overlap) to ensure light control and privacy.
*Measure the exact height of window from top edge of molding to either: bottom edge of molding; top of sill if there is one; or to the floor (i.e. to cover a patio door). Add 3" to allow for adequate mounting area above the window.
*If blind or shade extends to the floor (i.e. to cover a patio door) you will then need to deduct the following to prevent window treatment from touching the floor:
a)Vertical blinds, VertiCell shades, sliding panels (roller, solar and Roman shade fabrics) and soft vertical blinds - ½"
b)Sliding panels (natural shade fabrics) - 1"
*The factory makes NO allowance on outside mount blinds or shades.
KITCHEN CABINETS
What are the basic types of cabinets?
There are two basic types of cabinets, framed and frameless.
What is framed cabinet?
Framed cabinets have a face frame usually made of a hardwood such as Oak. When the doors of the cabinet are closed you can still see the cabinet face frames around the doors and drawer fronts and often you can see the hinges. The interior of the cabinet is wider on both sides than the cabinet opening. The face frame usually extends into the opening about 3/4" or more. Framed cabinets are the traditional style of cabinets in the United States and they are found in more homes than the newer Euro style.
What is frameless cabinet?
Frameless cabinets do not have a face frame. The front edge of the cabinet sidewall is the front of the cabinet. When the doors and drawers are closed they cover almost the entire cabinet. The hinges are totally concealed when the doors are closed. Euro style hinges are larger than the traditional framed cabinet hinge and tend to interfere more with the cabinet opening. Frameless cabinets often use a 32mm hole system for the hinge mounting and shelf support. The interior width is the same as the opening minus the door and hinge interference. Many newer homes have frameless cabinets.
WALLCOVERING / WALLPAPER
What are the advantages of wallcoverings?
Wallpaper is now firmly back on the design agenda, for its new textures, modern colours and designs, and its re-discovered practicality: much like a cosmetic concealer, textured wallcoverings can hide less than perfect walls. And it can save time, often it’s quicker than painting—especially as one ‘coat’ of wallpaper is all you need to cover the wall for instant colour.
Wallpaper is easy-care too—many modern papers are washable, durable and wear well.
Wallcoverings have great ‘touch appeal’ too; adding an important extra element of texture to a room.
Why wallpaper? Isn't paint cheaper and easier to install?
A well done wallpaper installation may last 15 to 25 years or more with a look that you simply cannot get from paint. The wallpaper and installation is paid for once, as opposed to multiple purchases of paint and labor to paint over the same period. Wallpaper is far easier to clean up when compared to paint as well. Generally speaking, you can wipe up any marks or stains from a wallpaper's acrylic or vinyl surface with a sponge. While the same can be said of modern painted surfaces, many times this leaves a shiny or dull spot where mark or stain used to be on a painted surface.
Useful Information
What do the terms STC and IIC stand for in relation to Sound Rated Floor Systems?
STC Rating:
The term STC refers to the single figure of evaluation used to quantify the transmission of airborne sounds through building elements, such as a wall or floor systems. These types of sounds would be the equivalent of voices, music, radio or television audio in the context of a multi-family building. The term STC translates to Sound Transmission Class and is measured and stated in accordance ASTM Standard number C634 and tested via the test methodology of ASTM Test Methods E 90, E 336 and E 596. When done in an accredited test laboratory, these values are stated as a number to the right of the initials STC. When done in the “Field”, using ASTM Method E 336, these values are designated by the initials FSTC to the left of the numeric value. STC values are in a large part influenced by solid mass of the structure, but are also somewhat dependent on isolation and resilience within the structure.
IIC Rating:
The term IIC refers to the statistical measurement standards used to quantify the transmission of impact sound energy through a floor/ceiling assembly system. These types of sounds would be the equivalent of foot traffic, dropped articles or furniture moving in the context of a multi family building. The term IIC translates to Impact Isolation Class and is measured & stated in accordance to ASTM Standard number C634 & tested via the test methodology of ASTM Test Methods E90, C423, E 548, E 717 and E 989. In addition, a new test protocol for concrete sub-floors has been introduced under ASTM E 2179-01. When done in an accredited test laboratory these values are stated as a number to the right of the initials IIC. When done in the “Field”, using ASTM Method E-1007, values are designated by the initials FIIC to the left value.</